Contents 6 sections
- Documents Required for a HepsiBurada Seller Application
- Choosing a Seller Type and Setting a Store Name
- Second Stage of Registration: Filling In Personal and Company Information
- Faprika's HepsiBurada Integration: Automatic Stock, Order and Invoice Management
- Grow Your Business by Selling on HepsiBurada!
- Frequently Asked Questions (FAQ)
If you want to claim your place in the world of e-commerce, becoming a seller on the HepsiBurada platform can be an excellent start. In this guide, we explain step by step how to apply as a HepsiBurada seller.
We will cover every detail, from the required documents to the application process, from the seller types you can choose to what to do after applying. With this detailed guide, designed to help you understand the process easily and complete your application smoothly, get ready to open the door to becoming a seller on HepsiBurada!
Documents Required for a HepsiBurada Seller Application
Your first step to becoming a seller on HepsiBurada is to prepare some important documents. Here are the documents you need for this process:
1. Tax Certificate: The official document showing that your business is subject to tax.
2. Activity Certificate: The official document stating your business's field of activity.
3. Signature Circular: The official document containing the signature specimens of the authorized persons.
4. Mersis Number: Your company's number registered in MERSİS (the Central Registry Recording System).
5. Trade Registry Certificate: The document showing your company's registration in the trade registry.
6. HepsiBurada Contract Documents: Documents containing the platform's terms and conditions of use.
Once your documents are ready, visit the HepsiBurada Seller Portal to start the HepsiBurada seller application process and click the 'New Application' option. At this step, you will need to choose the seller type that best suits your business.
Here are the options you will see:
Standard Seller Type: Ideal for every company that wants to grow its e-commerce.
Woman Entrepreneur Seller Type: For companies in which women hold 51% or more of the shares.
HepsiTürkiye Seller Type: For producers of local products.
HepsiYürekten Seller Type: For non-governmental organizations.
You can continue your application process by choosing the option that best suits your business among these.
Okumanızı öneririzTrendyol Satıcı Paneli Nedir? Trendyol Partner Ekranı Nasıl Kullanılır?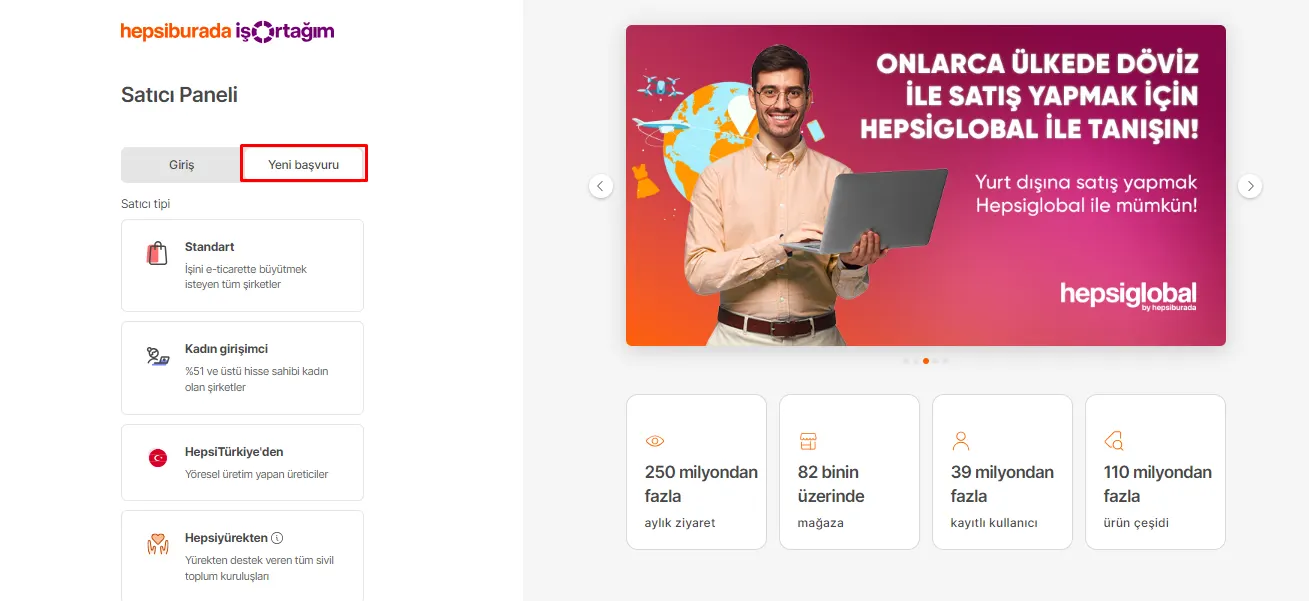
Choosing a Seller Type and Setting a Store Name
After choosing your seller type, you will need to set the store name that will appear on HepsiBurada. This step is important because it determines how your brand will be recognized in the online world.
Here are the steps to complete this process:
1. Set the Store Name: Depending on the seller type you chose, type the store name that will be displayed on HepsiBurada. This name will play a key role in helping your customers find and remember you.
2. Sign Up: After typing your store name, move the process forward by clicking the 'Sign Up' button. This step takes you to the next stage of your application.
With these two simple steps, you will have completed a basic step for your store on HepsiBurada. Your store name will become part of your identity on the platform, so choose carefully.
Recommended readingSelling on Ozon Global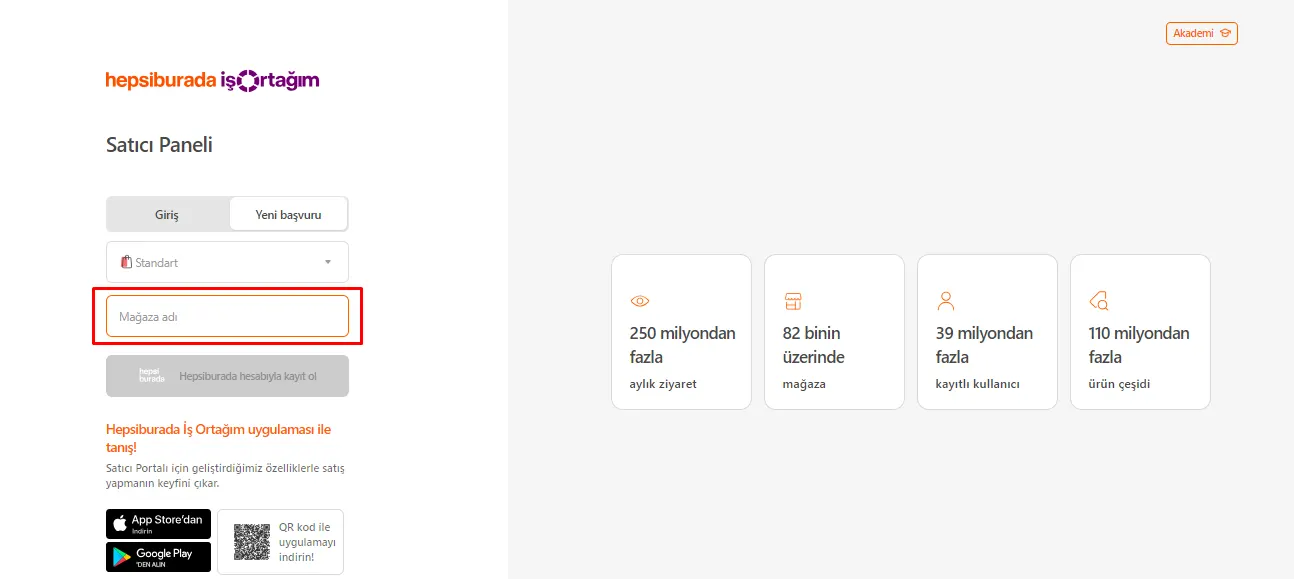
Second Stage of Registration: Filling In Personal and Company Information
After completing the 'Sign Up' option, you will need to enter the personal and company information required to start operating as a seller on the HepsiBurada platform. The information you fill in at this step will ensure your account is set up correctly.
Here is what you need to do in this process:
1. Enter Your Personal Information: First, enter your first name, last name, phone number and email address. This information will be the basic contact details of your account.
2. Fill In Company Information: After entering your personal information, you will need to fill in detailed information about your company. At this stage, query your tax number and fill in the following information in the form that opens:
- Sales Category
- Company Type
- TCKN/VKN
- Mersis Number
- Trade Registry Number
- Tax Office Province
- Tax Office Directorate
- Legal Name of the Company
- Referral code, if you have one
Once this information is entered, your account will be created. However, remember that your store will not yet be officially active at this stage. After your application is completed, you must log in to your account, press the “Complete Membership Information” button and fill in the remaining information. This step is critical for your store on HepsiBurada to become fully active.
We recommend readingHow to Do E-commerce? Beginner's Guide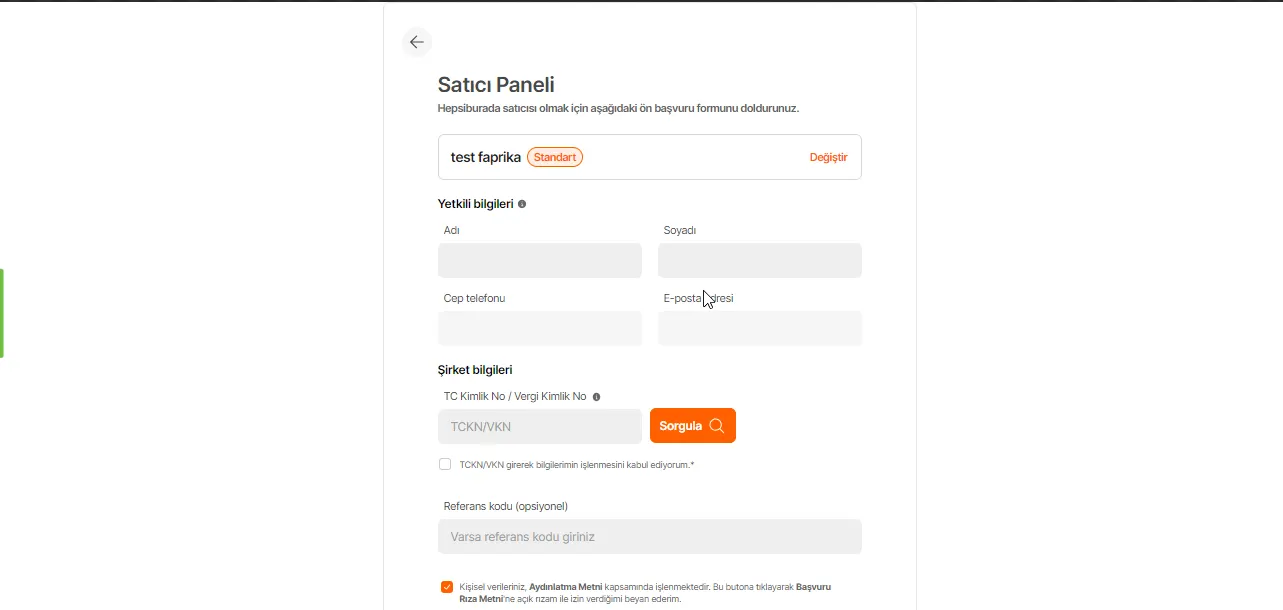
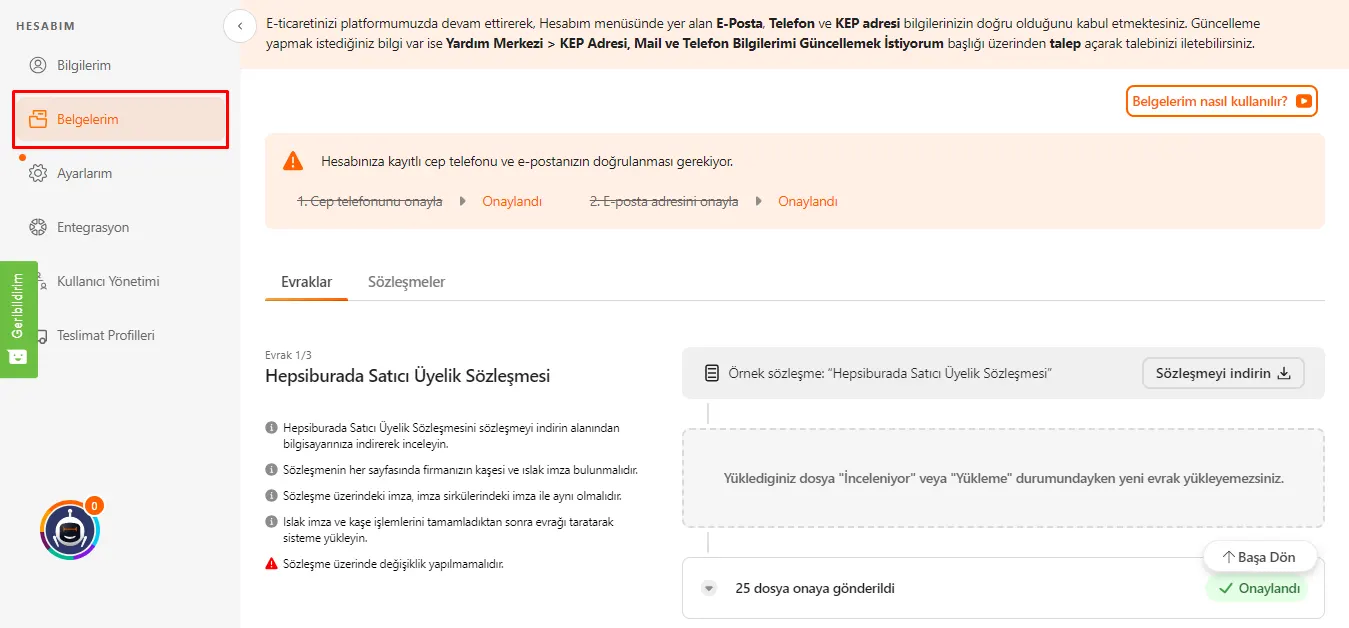
To become a seller on HepsiBurada, the required documents must be uploaded in full. If documents are missing, product upload is not permitted. To upload your documents, you can visit the 'My Documents' page in the Hepsiburada seller panel.
HepsiBurada applications are reviewed by the platform management once the steps are completed, and you are notified by email within a few days. When your application is approved, you can start uploading products.
Recommended readingHow to Open a Store on the N11 Marketplace?Faprika's HepsiBurada Integration: Automatic Stock, Order and Invoice Management
Faprika offers a complete integration to make things easier for HepsiBurada sellers. Thanks to this integration, you can manage your product stock, orders and invoicing processes automatically. With Faprika's powerful infrastructure, you can run your business on HepsiBurada more efficiently and serve your customers better.
You can now carry out tasks such as stock tracking, order management and invoicing faster and without errors. The Faprika–HepsiBurada integration helps your business grow and compete successfully.
Grow Your Business by Selling on HepsiBurada!
Don't miss the opportunity to become a seller on HepsiBurada to make your name known in the world of e-commerce and reach a wide customer base. In this detailed guide, you learned step by step how to apply as a HepsiBurada seller. Now it's time to grow your business!
By collecting the documents required to become a seller on HepsiBurada in full, you can integrate your business into the platform. Getting approval after the management reviews your application is the first step toward offering your products for sale on this large marketplace. Remember that this process is the beginning of strengthening your business's presence in the online world.
Claim your place on HepsiBurada by choosing the seller type that suits your needs and business type. Get the chance to serve your customers better by creating your own store. Hepsiburada offers everything you need to step into a successful future in the world of online commerce.
Are you ready to open the door to becoming a seller on HepsiBurada?
Frequently Asked Questions (FAQ)
Which Documents Are Required to Become a Seller on HepsiBurada?
Basic documents such as business documents, a tax certificate and an activity certificate are required. The contract documents requested by HepsiBurada must also be completed.
Which Seller Type Should I Choose?
There are different seller types on HepsiBurada. You can choose the one that suits your business's needs and characteristics. You can be a standard seller, a woman entrepreneur seller, a HepsiTürkiye seller or a HepsiYürekten seller.
How Should I Choose My Store Name?
Your store name represents your brand's identity in the online world. Take care to choose a name that is eye-catching, easy to remember and reflects your business.
How Long Does It Take for My Application to Be Approved?
After your application is reviewed by HepsiBurada, you will receive notification of approval or rejection by email within a few days.
Where Can I Upload My Documents?
You can easily upload your documents from the “My Documents” page in your HepsiBurada seller panel.
What Information Should I Fill In?
You must fill in your personal information (first name, last name, phone number, email) and your business information (tax number, trade registry number, etc.). This information ensures your account is set up correctly.
Are There Extra Steps to Activate My Account?
Yes, after your application is approved, you need to log in to your account, click the “Complete Membership Information” button and fill in the remaining information.
Which Seller Type Suits My Business?
Depending on your business's type and goals, different seller types may be suitable. You can choose the most suitable one by considering the characteristics of your business.
You May Also Like
- E-Commerce: What Is It? Types, Advantages and Disadvantages of E-Commerce
- ÇiçekSepetin’de Satış Yapmak ve Avantajları
- Pazarama’da Satış Yapmak ve Avantajları
- Amazon'da Satış Yapmak İçin Gerekli Bilgiler
- Pinterest Nedir? E-ticaret Siteleri İçin Pinterest’tin Faydaları
- Instagram Hikaye (Story) Paylaşma Rehberi