Contents 14 sections
- What Are Media Settings?
- What Are Media Settings For?
- Why Do Media Settings Matter?
- How Do You Set Up Media Settings in Faprika?
- What Are Canvas Width and Canvas Height?
- What Is the CDN Field For?
- Why Do Setting Changes Apply Only to New Products?
- How Many Pixels Does an Image Need to Fit a Box?
- Most Common Mistakes in Media Settings
- Media Settings Troubleshooting Table
- Media Settings Checklist
- When Should You Review Media Settings Again?
- Media Settings with Faprika
- Frequently Asked Questions
You spent hours shooting the product photo in the studio and uploaded it to the panel, but on the storefront it looks blurry, in the cart it looks huge, or on the product page it looks cropped. No matter how good the product is, the image creates the first impression; customers don't trust a blurry photo, and they won't wait on a slow-loading page either. Most of the time the problem is not the photo itself but the settings that decide at what size and quality that photo is displayed on the site.
In this guide we cover media settings on the actual Faprika panel screen: what the small, medium and large image sizes do, what canvas width and height determine, what to enter in the CDN field, and why a change applies only to new products. Beyond the panel, we also offer a practical look: a small tool that calculates how many pixels an image needs to fit its box, and an eight-item checklist. Preparing, resizing and naming the photo itself are covered in separate articles: product image optimization and bulk product image upload. Here we focus only on setting up media settings correctly in the panel.
What Are Media Settings?
Media settings determine at what pixel dimensions and in what quality the images uploaded to the panel are stored and displayed on the site. You manage the dimensions and resolution of the canvas the images sit on, that is, their pixel ratios, from this area.
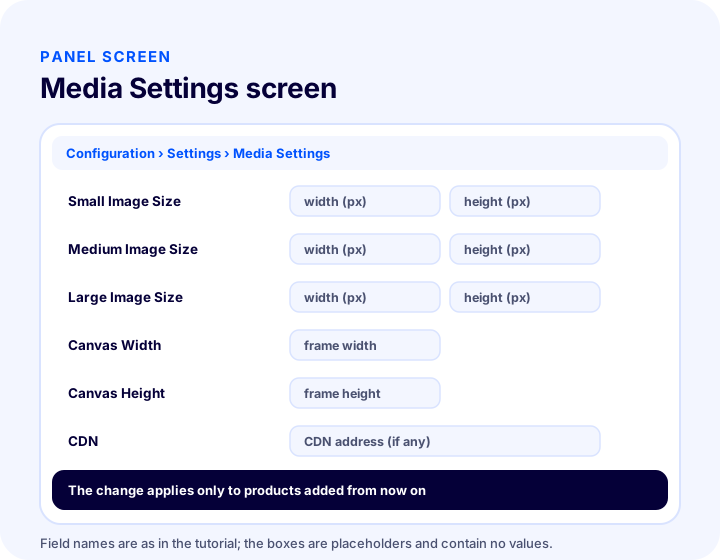
In Faprika, these settings are under Configuration > Settings > Media Settings in the control panel. The screen has three image sizes (small, medium, large), two canvas dimensions (width and height) and a CDN field. These six fields are the basic controls that determine how your site displays product images.
We recommend readingMedia Settings Management TrainingWhat Are Media Settings Used For?
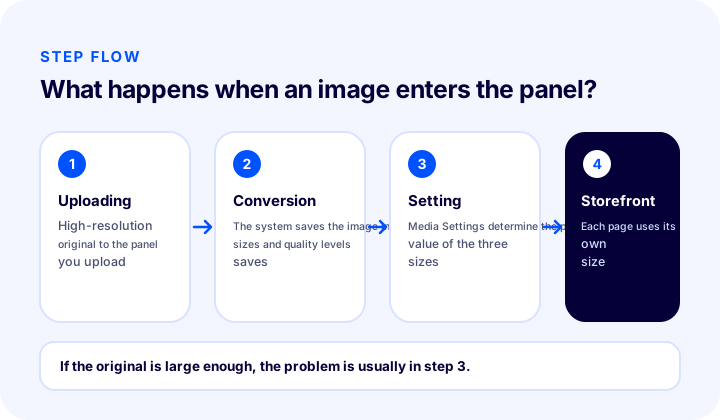
Media settings exist to display each image at a size suited to where it is used. When you upload an image to the panel, the system converts and saves it in three different sizes and qualities; these settings determine how many pixels each size will be.
In practice, this means the same photo appears in three different places on your site at three different sizes: in the small preview in the cart, in the product grid on the category page and on the product detail page. Using the same file for all three sacrifices either speed or sharpness. Showing a large file in a small box needlessly weighs down the page; showing a small file in a large box creates blur. Three separate sizes solve this dilemma.
The setting is most useful when your original photo is high resolution but looks low quality in the panel. In that case you don't need to reshoot the file; most of the time raising the pixel value of the relevant size is enough.
Why Do Media Settings Matter?
Media settings matter because the product image is the main element of the decision moment in e-commerce, and an image that is both sharp and fast to load directly affects sales. The customer can't touch the product; they look at it. How comfortable that look is depends on how sharp the image is and how quickly it arrives.
Three reasons stand out:
- Trust. A blurry or pixelated photo raises doubts about the quality of the product and the store.
- Speed. Every image adds to the weight of the page; files that are larger than necessary slow down page loading. For the link between speed and sales, see the article why site speed matters in e-commerce.
- Consistency. When products sit in the same frame at the same size on the category page, the store looks orderly; the canvas size ensures this.
The topic matters even more for stores with high mobile traffic, because a phone screen is small and the connection is often weaker than on desktop. For general behavior on phones, the article e-ticaret sitesinde mobil uyumun önemi is a good complement.
How Do You Configure Media Settings in Faprika?
In Faprika, media settings are configured in the control panel under Configuration > Settings > Media Settings. The screen has three image sizes, canvas width, canvas height and a CDN field; you adjust each one to your needs and save.
Follow this order to proceed step by step:
- In the control panel, open the Configuration > Settings > Media Settings screen.
- Identify which image looks blurry or larger than necessary on which screen; find the relevant size field.
- Adjust the pixel value in that field according to your needs.
- Check whether the canvas size matches the ratio of your products.
- If you use a CDN, enter its address in the CDN field.
- Save, then upload a new product and test the result on all three screens.
The sixth step is critical: the settings apply only to products added from that point on, so you need to add a new product to see the effect. We return to this topic in a separate section.
Small Image Size
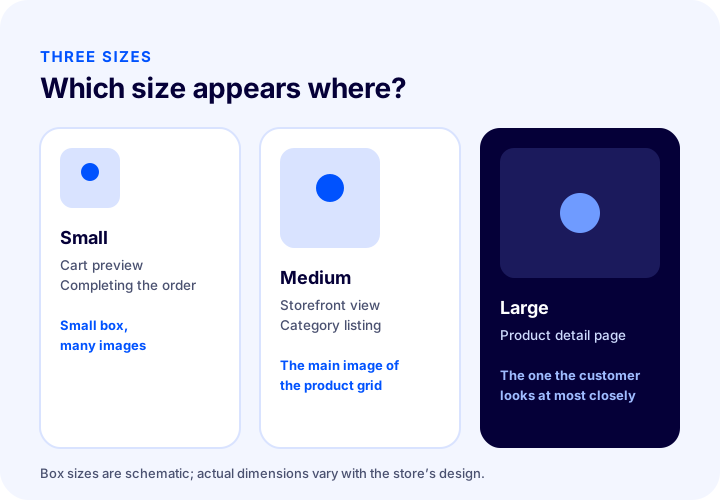
The small image size determines the images you see on the cart preview and order completion screens. On these screens the product sits in a small box for identification only; the customer doesn't examine the product with that photo, they just confirm that they see the right product in their cart.
That is why it makes no sense to keep this size larger than necessary. But shrinking it too much is not good either: on phones and high-density screens, a tiny image looks soft and faded when stretched to the box. The right value is a few times the real box size in the cart; the tool below helps you calculate it.
Medium Image Size
The medium image size determines the images on the storefront view and category listing screens. This is one of the places where the customer spends the most time: they browse among products and mostly decide which one to click by looking at the image.
On a category page, dozens of images load at the same time. So the medium size must be both sharp and measured: if sharpness is insufficient, the store looks careless; if the size is needlessly high, the page gets heavy. When you want to improve image quality, this is often the first field to look at.
Large Image Size
The large image size determines image quality on the product detail page. This is where the customer looks at the product most closely: they examine the texture, the detail, the color, and maybe zoom in. The purchase decision often rests on the persuasive power of this image.
On the detail page only a few images of a single product are loaded, not dozens as on the category page. So you can be more generous with the large size. Still, there is an upper limit: a huge file that doesn't fit the screen adds no sharpness and only lengthens loading time.
| Setting | Where does it appear? | What is it adjusted for? |
|---|---|---|
| Small Image Size | Cart preview, order completion | Keeping the image sharp in the small box |
| Medium Image Size | Storefront view, category listing | Image quality in the product grid |
| Large Image Size | Product detail page | Image quality on the detail page |
| Canvas Width | The frames the products sit in | Width of the frame |
| Canvas Height | The frames the products sit in | Height of the frame |
| CDN | The address the images are loaded from | Faster image loading |
What Are Canvas Width and Canvas Height?
Canvas width and height are the dimensions of the frame the products sit in. Independently of the image itself, you set the width and height of the area where the product will be placed using these two fields.
Think of the canvas as a photo frame: whatever the photo is like, the frame's size is fixed. When all products on a category page sit in a frame of the same size, the grid looks tidy; if the frames differed from each other, the rows would fall apart. That is why canvas size is a quiet but powerful part of the store's visual order.
When choosing the canvas size, pay attention to two things. First, the ratio of your product photos: if you mostly shoot vertical photos, a horizontal frame leaves a lot of empty space, and the reverse squeezes the product. Second, using the same shooting ratio for all products: photos with mixed ratios create excess space on some products whichever canvas they are in. The workflow in the bulk product image upload guide helps with this consistency at the shooting stage.
What Does the CDN Field Do?
The CDN (content delivery network) field is where you enter the address of a CDN service, if you use one, to make images load faster. A content delivery network aims to shorten loading time by delivering files from servers closer to the visitor.
This field is optional. If you don't use a CDN, you leave it empty. If you do, writing the address correctly is essential: a wrong address can cause the images not to load at all. So after adding the CDN address, open your site right away and check that the images appear. The site speed article is a starting point for the general logic of a CDN and other speed measures.
Recommended readingWhy Does Site Speed Matter in E-Commerce?Why Does a Setting Change Apply Only to New Products?
Changes to canvas and size settings apply only to products added from then on, because an image is converted and saved in the relevant sizes at the moment it is uploaded to the panel. The images of products already in the panel were produced with the old settings and are not affected by this change.
The training's clear warning is this: if you want to change the dimensions of existing products, you need to delete the products and upload them again. In practice this has two consequences:
- Set it up before uploading products. If you are setting up a new store or starting a bulk product upload, adjust Media Settings first. Fixing it later means re-uploading all uploaded products.
- For existing products, try with a single product first. Don't delete and upload hundreds of products without being sure the new value works. First re-upload one product, see the result on three screens, then make your decision.
Deleting and re-uploading may affect other information linked to the product, so plan the operation. Clarify in advance how product information, stock code and image order will be preserved. For the safe way to do bulk operations, you can follow the steps in the bulk product image upload article.
We recommend readingHow to Optimize Product Images?How Many Pixels Does an Image Need to Fit Its Box?
The width an image needs to look sharp is the product of the box's width on screen and the screen's pixel density. On a high-density screen, one pixel is drawn with more than one physical dot; so a box that appears 300 pixels wide needs a 600-pixel image.
Knowing this calculation is the most reliable way to choose which value to enter in media settings. The tool below takes three values: the width of the box on screen, the density multiplier of the target screen, and the width of the image you set in the panel or uploaded. As a result it tells you the required width and whether the image is sufficient.
Keep three points in mind when using the tool. First, the calculation is based on the width of the box on screen; box widths differ in the cart, on the category page and on the detail page, so enter a separate value for each. Second, once the image reaches several times the required width, sharpness doesn't increase, only the file grows. Third, box size may differ on the widest screen and on a phone; check both and decide based on the larger one.
The Most Common Mistakes in Media Settings
The most common mistakes in media settings are leaving sizes larger or smaller than necessary, configuring the setting after uploading products, and testing the change on only one screen. Most arise not from the settings screen but from not looking at the result of the setting on the customer's side.
Setting everything to the largest value
Keeping all three sizes high “just in case” looks tempting. But showing a high-resolution image in the small box in the cart does nothing but slow the page down. Set each size according to the box it is used in.
Forgetting the small image
It is a common mistake to work on the storefront and detail images and skip the small image on the cart and order screen. The customer looks at this small image at the moment closest to payment; if it looks blurry, trust is damaged right then.
Changing the setting after uploading products
Because the setting applies only to new products, changing a value after uploading thousands of products fixes nothing; existing products stay as they were. Media settings are part of the preparation before uploading products.
Not matching the canvas ratio to the product ratio
Keeping the frame horizontal when products are shot vertically leads to small images with wide empty space around them. The shooting ratio and the canvas ratio must match each other.
Testing only on desktop
An image that looks sharp on desktop may stay soft on a high-density phone. After the change, be sure to look on a phone as well.
Saving the CDN address without checking it
A misspelled CDN address can cause images not to appear. After saving the address, open three screens and confirm the images load.
Looking for the problem in the settings and skipping the original file
If the original photo is already low resolution, no setting can make it sharper. No matter how much you increase the large image size, a small file will not produce a large, sharp image. First make sure the original is large enough.
Okumanızı öneririzE-Ticaret Sitesinde Mobil Uyumun ÖnemiMedia Settings Troubleshooting Table
Most problems seen in media settings can be traced to the right field by looking at the symptom. The table below summarizes which setting to check for each symptom.
| Symptom | Likely cause | Setting to check |
|---|---|---|
| Image looks faded in the cart | Small image size is too low | Small Image Size |
| Products look blurry on the category page | Medium image size is too low | Medium Image Size |
| Image looks soft on the detail page | Large image size is too low or the original is small | Large Image Size, original file |
| Category page opens slowly | Medium image size is larger than necessary | Medium Image Size |
| Products have gaps or are cropped in the frame | Canvas ratio does not match the shooting ratio | Canvas Width, Canvas Height |
| Images do not load at all | CDN address is incorrect | CDN |
| I changed the setting and nothing happened | The change applies only to new products | Try it with a new product; re-upload existing ones |
Takeaway from the table: first look at which screen the symptom appears on. The screen immediately shows which size setting is responsible.
Media Settings Checklist
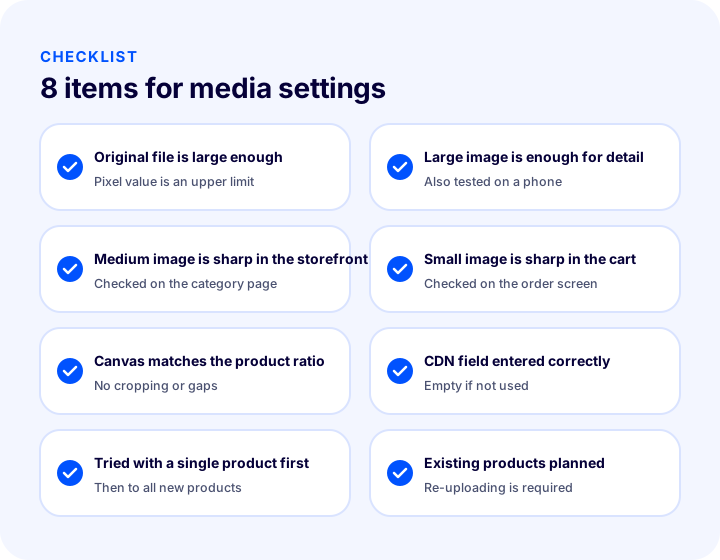
The media settings checklist gathers the eight items you should go through before publishing your settings and at regular intervals. The visual and tool below present the same items in different ways; the table gives the same information as text.
| Field | Check | Done? |
|---|---|---|
| Original file | Photos are in large enough resolution | Yes / No |
| Large image | Sharp on the detail page | Yes / No |
| Medium image | Sharp on the storefront, page is fast | Yes / No |
| Small image | Sharp on the cart and order screens | Yes / No |
| Canvas size | Matches the product ratio, no cropping or gaps | Yes / No |
| CDN field | Entered correctly or left empty | Yes / No |
| Test | Tried with a single new product, also on a phone | Yes / No |
| Existing products | Re-upload planned | Yes / No |
When Should Media Settings Be Reviewed Again?
Media settings should be reviewed again whenever your visual layout or shooting method changes: when you apply a new design, change the ratio of your product photos, switch to higher-resolution shooting, or notice that images look blurry or slow. Settings are not something to configure once and forget; they are a setup that gets updated as the store grows.
One point must not be forgotten: changing the setting does not automatically convert existing products. So plan the decision to change not only around the setting, but around which products that change will reach. Maintaining the balance between image quality and speed is a lasting gain, both in search results and in the customer experience.
Other details about the image itself, namely file name, alt text and format choice, are covered in the product image optimization article. When you apply both articles together, the panel setting and the image preparation complement each other: one determines at which sizes the image is stored, the other how well that image is prepared.
Media Settings with Faprika
In Faprika, media settings are gathered on a single screen: Configuration > Settings > Media Settings. From here you manage the small, medium and large image sizes, canvas width and height, and the CDN field. Because every image uploaded to the panel is saved in three sizes, the same photo is shown in the cart, on the category page and on the product detail page at the size that fits its own box.
This way you can improve image quality from the panel, without dealing with code and without reshooting the image. To learn how to use media settings in your own plan and what else you get along with other features, you can review our plans or request a demo.
Frequently Asked Questions
What are media settings?
Media settings are the settings that determine at which pixel sizes the images uploaded to the panel are stored and shown on the site. In Faprika they consist of the small, medium and large image size, canvas width, canvas height and the CDN field.
Where do you find media settings in Faprika?
You reach them in the control panel via Configuration, Settings, Media Settings. The same screen has the three image sizes, two canvas dimensions and the CDN field.
What are the small, medium and large image sizes for?
The small image size determines the images on the cart preview and order completion screens, the medium image size determines the storefront view and category listing, and the large image size determines the image quality on the product detail page. An image uploaded to the panel is saved in these three sizes.
Why does the image I uploaded look blurry in the panel?
If the original image is high resolution but looks low quality in the panel, the pixel value of the relevant image size may have been set too low. Raising the relevant size in Media Settings often solves the problem. If the original file is already small, the setting alone will not sharpen it.
I changed the media settings but the old products didn’t change. Why?
Changes to canvas and size settings apply only to newly added products; they do not affect the sizes of existing products in the panel. To change existing products, they must be deleted and uploaded again. Trying with a single product first is the safest way.
Is it mandatory to fill in the CDN field?
No. If you use a CDN service so your images load faster, you enter its address in this field; if you don’t, it is left empty. After entering the address, be sure to check that the images appear on the site.