
Contents 14 sections
- What Is Bulk Product Image Upload?
- Why Match Images by File Name?
- How Does Bulk Image Upload Work in Faprika?
- Which Matching Key Should You Choose?
- Hyphen, Underscore or Asterisk as Separator?
- File Name Examples: Right and Wrong
- How to Set Up a Workflow from Shooting to Upload
- How to Avoid Mixing Up Codes During the Shoot
- How to Organize Images Received from Suppliers
- Common Mistakes in Bulk Image Upload
- How to Check After Uploading
- What to Do After Images Are Uploaded
- Managing Bulk Image Upload with Faprika
- Frequently Asked Questions
The shoot for a hundred-product collection is done, there are three hundred photos in the folder, and all of them have names like "IMG_4021.jpg". Now each photo has to be added to its product's page one by one: open the product, pick the file, set the order, save, move on to the next. This takes days, and every step risks putting the wrong photo on the wrong product. Yet the real work is solved not at the shoot but in the names given to the files afterwards.
In this guide we explain the logic of bulk product image upload, that is, the setup in which the file name becomes the matching key for the product: which code to name files after, how to choose the sequence separator, which steps to follow from shooting to upload, which mistakes cause images to land on the wrong product or not upload at all, and how to check after uploading. Image size, format and alt text are a separate topic, covered in the product image optimization guide; here we skip them and focus only on the naming and matching workflow. There are also two small tools: a bulk image upload planner and an upload checklist.
What Is Bulk Product Image Upload?
Bulk product image upload means importing photos for many products into the system in a single operation, without opening product pages one by one. Images are matched to the relevant product by the code in their names.
The logic is simple: each photo's file name carries two pieces of information. The first is the code that says which product it belongs to (barcode, stock code or product ID); the second is the order among photos of the same product. The system reads the file name, looks up the code, finds the product and links the image to it. So the human work shifts from dragging images onto products one by one to naming them correctly. Once the name is right, the upload takes minutes; when it is wrong, the error spreads across hundreds of files.
That is why bulk image upload looks like an upload job but is really a data organization job. The codes already live in the product catalog; the shooting and naming stage carries those codes onto the photos.
We recommend readingHow to Do Bulk Product UpdatesWhy Match Images by File Name?
Because uploading one by one is both slow and error-prone. Matching by file name links hundreds of images to the right products with the same rule, all at once.
The cost of one-by-one uploading grows in proportion to the number of products. A hundred products with three photos each means three hundred separate file selections. A brief lapse of attention in any one of them is enough to send a photo to another product. The result is a customer seeing a red shoe on the black shoe's page, and that mistake can go as far as an order return.
- Speed: The upload is a single operation; even as the number of products grows, the waiting time stays almost the same.
- Consistency: The same rule applies to all products; cases of "I forgot to order this product's photos" become rarer.
- Repeatability: When a new season or a new supplier arrives, the same setup is reused.
- Traceability: Looking at the file name tells you which product it belongs to; finding a wrong image becomes easier.
The place where matching happens is the "Bulk Image Upload" area in the panel; like other changes that can be made in bulk across products, it is a time-saving bulk operation. For the general logic of other bulk operations, see the bulk product update guide.
How Does Bulk Image Upload Work in Faprika?
In Faprika, products photographed in bulk are coded by barcode, ID or stock code, a separator is chosen, and the images are uploaded to the system. This makes it easy to determine which image belongs to which product and in what order it will be published.
There are two choices on the screen: Image Name (which piece of product information the code in the file name corresponds to) and Image Sequence Separator (the character that separates the code from the sequence number). Together these two choices define the file name rule. The illustration below shows the logic of the screen with the selected values; the values are examples.
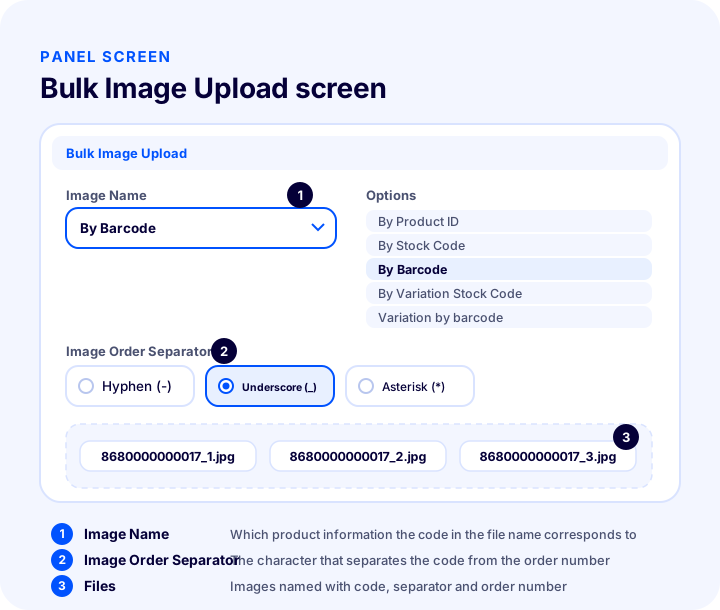
Image Name: What Does the Code in the File Name Stand For?
The Image Name option determines which product field the code at the start of the file name will match. There are five options: By Product ID, By Stock Code, By Barcode, By Variation Stock Code and By Variation Barcode.
The first three are the product's own information. The last two are at variation level: when an image belongs not to the product itself but to a specific variation of it, the variation's own stock code or barcode is used. Whichever you choose, all file names must follow that choice; you should not mix two different codes in one upload.
Image Sequence Separator: The Character That Splits Code from Order
The Image Sequence Separator is the character that separates the code from the sequence number written next to it to order several photos of the same product. There are three options: Hyphen (-), Underscore (_) and Asterisk (*).
The example in the tutorial illustrates this well: a shoot was done for a hundred products, each product was listed by barcode, three photos were prepared per product, and underscore was chosen as the separator. In this case each product's photos appear as "Barcode value_1", "Barcode value_2" and "Barcode value_3". So the file name consists of code, separator and sequence number. Different setups can be built with combinations of Image Name and Sequence Separator.
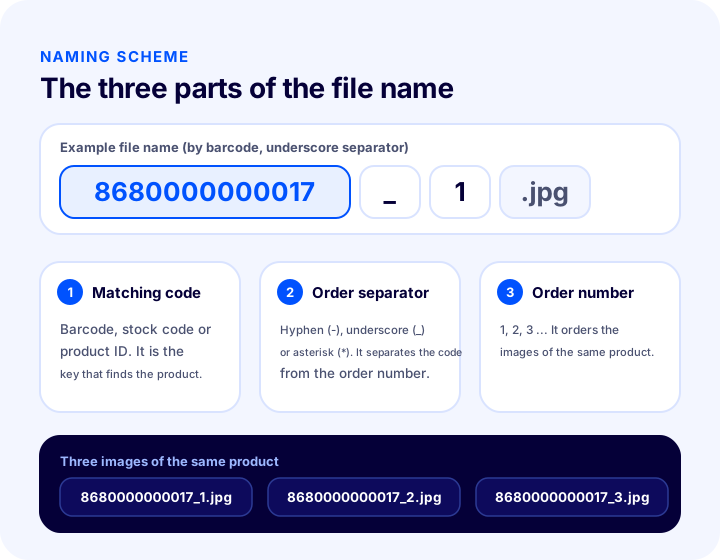
A summary table to see the options at a glance:
| Setting | Options | What does it determine? |
|---|---|---|
| Image Name | By Product ID, By Stock Code, By Barcode, By Variation Stock Code, By Variation Barcode | Which product information the code in the file name will match |
| Image Order Separator | Hyphen (-), Underscore (_), Asterisk (*) | The character that separates the code from the order number |
For a detailed walkthrough of the screen, see the bulk image upload tutorial.
Which Matching Key Should You Choose?
The best key is the code you already have before the shoot and that is unique for every product. If you have a barcoded warehouse, choose barcode; if you have your own code system, choose stock code; if you have neither, choose product ID.
The only criterion when choosing the key is uniqueness: if two products share the same code, images may go to the wrong product. How to generate and keep codes consistent is covered in detail in the SKU (stock code) and barcode guides; here we compare them only from the image naming angle.
| Key | When is it suitable? | Point to watch |
|---|---|---|
| Barcode | If products have barcodes and barcodes can be scanned during the shoot | Make sure barcodes are unique and identical to those on the product cards |
| Stock code | If you have your own code system; if the code is readable and memorable for the team | The same code must not be used for two products; letter case must be consistent |
| Product ID | If products are already created in the panel and IDs can be taken from the list | The ID is known only after the product is created in the panel; the shoot plan must wait for it |
| Variation stock code | If each variation (color, size) has its own image | During the shoot, which variation is being photographed must be recorded |
| Variation barcode | If variations are managed with their own barcodes | Do not confuse the product barcode with the variation barcode |
A practical rule: choose the key before the shoot starts and export the product list with that key. Changing the key after the shoot means renaming hundreds of files.
We recommend readingWhat Is a Barcode? How to Get and Use Product Barcodes in E-CommerceHyphen, Underscore or Asterisk as Separator?
Choose as the separator a character that does not appear in your code. That way the product code and the sequence number never get mixed up, and the file name can be read in only one way.
For example, if your stock codes contain hyphens like "BLZ-001", choosing the hyphen separator makes the file name "BLZ-001-1", and it becomes unclear where the code ends and the sequence begins. With the same code, the underscore separator gives "BLZ-001_1" and the split is clear. Do not take a risk without knowing how the system will resolve this ambiguity: do not make a character that appears in the code your separator.
| Separator | Fits well | Avoid |
|---|---|---|
| Hyphen (-) | Codes made up only of digits (barcode, product ID) | If codes contain hyphens |
| Underscore (_) | Stock codes containing hyphens; the safest general choice | If codes contain underscores |
| Asterisk (*) | If codes contain both hyphens and underscores | Some operating systems do not allow an asterisk in file names; if the shoot folder will be set up on such a system, test first |
File Name Examples: Right and Wrong
A correct file name consists of code, separator and sequence number, and has the same format in all files. The wrong ones usually have an extra word, a space or a differently written code.
| File name | Situation | Why? |
|---|---|---|
| 8680000000017_1.jpg | Correct | Barcode, underscore separator and sequence number |
| 8680000000017_2.jpg | Correct | Second image of the same product |
| 8680000000017 _1.jpg | Incorrect | There is a space after the code; the code does not match |
| 8680000000017_on.jpg | Incorrect | A word was written instead of the sequence number |
| 8680000000017_1 (kopya).jpg | Incorrect | Extra name added during copying |
| IMG_4021.jpg | Incorrect | No code; it is unclear which product it belongs to |
| 8680000000017-1.jpg | Depends on the choice | Correct only if Hyphen was selected as the separator |
What stands out in the table is that most mistakes are "invisible": a space or an extra "(copy)" goes unnoticed but breaks the match. That is why it is safer to produce names not by hand but with bulk renaming or from a code list. The tool below shows the first file names as examples once you enter your rule; the values are examples, so change them to fit your own setup.
When reading the result, look at the total number of files: before uploading, the number of files in your folder must be the same. If there is a difference, a product's photo is missing or extra.
How to Set Up a Workflow from Shooting to Upload
The right workflow is six steps in order: prepare the product list, shoot, name, check, upload and verify. Naming is planned together with the shoot plan, not after the shoot.
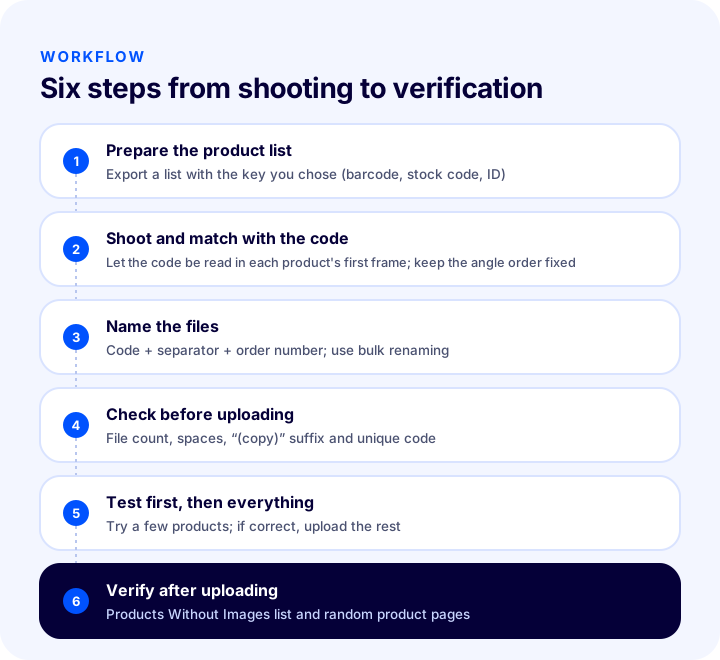
- Prepare the product list: Export a list that includes the key you chose (barcode, stock code or ID). The shoot proceeds according to this list.
- Match the shooting order to the code: Place a card or label showing its code next to each product; if the code is readable in the first frame, there is no confusion about which product later photos belong to. For shooting technique, see the how to take product photos guide.
- Name the files: Name each photo with code, separator and sequence number. Work with bulk renaming or with names generated from a code list, not by hand.
- Check before uploading: Does the number of files in the folder match the total given by the planner? Are there files without a code, with spaces or with a "(copy)" suffix? Does every product have a first photo?
- Upload a trial first, then everything: Try with a few products; if the images go to the right product in the right order, upload the rest.
- Verify after uploading: Confirm that no product is left without an image and that the images are correct on a few randomly chosen product pages.
How Do You Keep Product Codes from Getting Mixed Up During the Shoot?
To keep codes from getting mixed up, start each product's shoot with a frame in which the code is readable, and keep the photo sequence fixed. That way the question "which product does this frame belong to?" never goes unanswered during naming.
The most common problem with multi-product shoots is that photos are lined up in a folder in shooting order, but nobody can later remember which product they belong to. Three methods reduce this problem:
- Divider frame: The first frame of each product is a sheet of paper or a barcode label showing the product's code. During naming, this frame marks where the product starts.
- Fixed angle sequence: Shoot every product in the same order: main view first, then side, back, detail. The sequence number matches this order, so number one is always the same angle for every product.
- Work in batches: Do not put a hundred products into one folder; split them into batches of twenty-five. If something goes wrong, you only need to re-check one small batch.
If a product has variations such as size and color, also record which variation was photographed. If you will name files at the variation level (by Variation Stock Code or Variation Barcode), the shoot list must also include the variations' own codes; the product's general code is not enough in that case.
We recommend readingHow to Photograph ProductsHow Do You Organize Images Received from Suppliers?
To bulk-upload images from suppliers, you first need to convert the file names to your own codes. The supplier's naming may not match your key.
Supplier images often carry the supplier's own code, while your catalog may use a different stock code or barcode. In that case, create a table that maps the two codes: the supplier code in one column, your key in the next. Bulk-rename the files according to this table, then upload. Keeping the table saves you from starting over the next time the same supplier sends new images.
Also check the size and quality consistency of incoming images separately; this topic is covered in the product image optimization guide.
Common Mistakes in Bulk Image Uploads
The most frequent mistakes are choosing the key after the shoot, using the same code for two products, leaving spaces or extra words in file names, and confusing the separator with the code.
| Mistake | Consequence | Solution |
|---|---|---|
| Thinking about naming only after the shoot | Nobody remembers which product the photos belong to | Choose the key before the shoot and use a divider frame |
| Using the same code for two products | Images may end up on the wrong product | Check that codes are unique before uploading |
| Leaving spaces or "(copy)" in file names | The code does not match, so the image is not uploaded or is linked wrongly | Use bulk renaming; do not fix files one by one by hand |
| Confusing the separator with the code | The code and the sequence number cannot be told apart | Choose a character that never appears in the code as the separator |
| Using two different keys in one upload | Some match, some do not | Choose a single Image Name option for all files |
| Assigning sequence numbers at random | Gallery order becomes inconsistent across products | Use the same angle sequence for every product |
| Bulk upload without a trial run | The error spreads across hundreds of files | Try with a few products first |
There is one more point that is easy to overlook: the file naming rule has nothing to do with an image's size or quality. Images with correct names but heavy file sizes will also upload and slow down page speed; naming and optimization therefore cannot replace each other.
Recommended readingWhat Is a SKU? How to Create a Stock CodeHow Do You Check After Uploading?
After uploading, two checks are made: first confirm that no product is left without an image, then verify on random products that the images are linked to the right product and in the right order.
In Faprika, the advanced search on the Bulk Product Update screen has "Products Without Images" and "Products With Images" options. When you open the "Products Without Images" list after uploading, any product you included in the upload that is still on the list means its image was not matched. This list also shows products that were forgotten during the shoot.
- List products without images: See whether any of the products you just uploaded remain on the list.
- Inspect the file names of the remaining ones: There is usually a spelling difference in the code, a space, or a missing file.
- Open ten random products: Confirm that the images belong to the right product and that their order is as you expect.
- Fix the errors and upload again: Re-upload only the faulty files with the correct name; there is no need to upload the whole folder again.
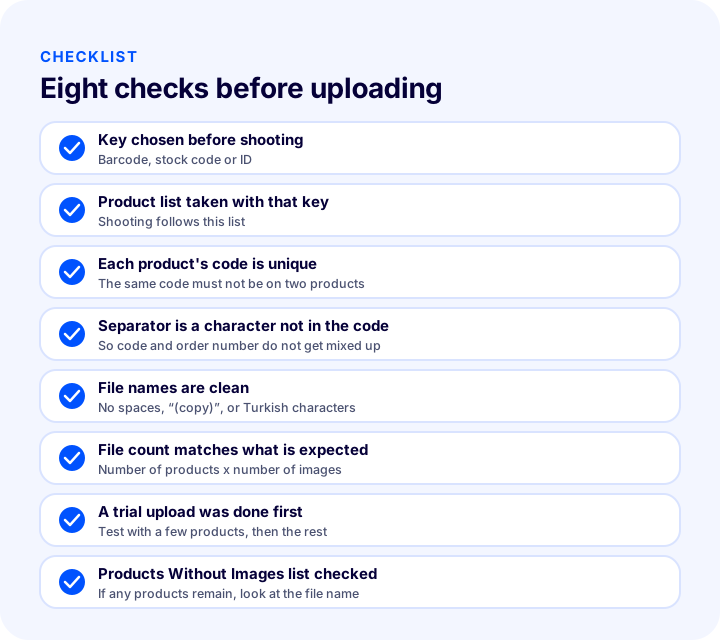
The checklist below brings the same logic together for before, during, and after the upload.
| Stage | Check | Done? |
|---|---|---|
| Before shooting | Key chosen, product list exported with that key | Yes / No |
| Before shooting | Codes are unique | Yes / No |
| Naming | Separator is a character not in the code | Yes / No |
| Naming | No spaces, "(copy)", or Turkish characters in file names | Yes / No |
| Before upload | File count matches the expected total | Yes / No |
| Before upload | Trial run done with a few products | Yes / No |
| After upload | Products Without Images list checked | Yes / No |
| After upload | Order and accuracy confirmed on random products | Yes / No |
What Do You Do After the Images Are Uploaded?
Once the images are uploaded, next comes the image's own quality and its placement on the product page: alt text, size, and gallery layout. Bulk upload solves matching with the product, but it does not by itself guarantee the visual quality of the page.
After uploading, inspect the product page's image gallery: is the first image the frame that explains the product most clearly, is the order sensible, are the images in the same aspect ratio? The article on how an e-commerce product page should look offers a framework for checking gallery layout and alt text. If you wonder how images will behave depending on your product types, the product types guide is also helpful.
For a well-kept catalog, bulk upload is not a one-time job. As new season products, new suppliers, or refreshed photos arrive, the same rule is used again. Writing the rule into a document ensures everyone on the team uses the same naming.
Managing Bulk Image Upload with Faprika
Bulk image upload in Faprika is a bulk operation based on product codes: you choose the Image Name and the Image Order Separator, images are uploaded to the system according to their codes, and which image belongs to which product is determined from the file name.
The workflow in this article has a counterpart in the panel: you prepare the product list, choose the code, name the files, check, and upload; you then verify the results with the advanced search on the Bulk Product Update screen. This way, the images of hundreds of products are managed in a single flow.
For other areas of bulk operations, see the bulk product update training. For the status of features by plan, there is the e-Commerce plans page; to learn how to apply this to your own product structure, you can contact our team.
Frequently Asked Questions
What is bulk product image upload?
Bulk product image upload means importing photos for many products into the system in a single operation, without adding them to each product page one by one. Images are matched to the right product by the code in their file names.
Which code should images be named after?
In Faprika, images can be named by product ID, stock code (SKU) or barcode. For variation-level uploads, the variation's stock code or barcode can also be chosen. The code you choose must be the same in all file names.
What does the Image Sequence Separator do?
The Image Sequence Separator is the character that separates the code from the sequence number written next to it to order several images of the same product. The options are Hyphen (-), Underscore (_) and Asterisk (*).
How do you name multiple images of the same product?
Images of the same product are named with the code, a separator and a sequence number. In the example from the tutorial, three images are prepared for each product and given with an underscore separator as barcode_1, barcode_2, barcode_3; the sequence number determines the order in which the images are published.
Which file name mistakes prevent an image from uploading?
A space after the code, an extra word or a "(copy)" suffix, a missing or misspelled code, and mixing two different codes in one upload all break the match. Generating file names with bulk renaming reduces these mistakes.
How do you check that images went to the right products after uploading?
On the Bulk Product Update screen, use the Products Without Images option in advanced search to see whether any of the products included in your upload are still missing images. Then check on random product pages that the images are linked to the correct product and in the correct order.