
Contents 13 sections
- What Are Staff Permissions?
- Why Are Staff Permissions Important?
- What Is the Principle of Least Privilege?
- What Are the Typical Roles and Permissions in an E-Commerce Team?
- How to Design Permissions Step by Step
- How Do You Set Up Staff Permissions in Faprika?
- What to Do When a Team Member Joins, Changes Roles, or Leaves
- Why Does a Shared Password Cause Problems?
- How Do You Measure Your Permission Risk?
- How Often Should Permissions Be Reviewed?
- Common Mistakes in Staff Permissions
- Checklist for a Permission Audit
- Frequently Asked Questions
E-commerce grows, and so does the number of people entering the panel. At first you work alone; then a warehouse worker, a customer service representative, a marketing specialist, and an accountant join. At the start, giving everyone the same password or making everyone an administrator seems practical. Months later a product price has changed overnight, nobody can tell who cancelled an order, and the account of someone who left is still open.
In this guide staff permissions are covered from start to finish: why they are needed, what the principle of least privilege says, e-commerce which areas the typical roles in your team need, how to manage joining, role changes, and leaving, how often to review permissions, and the most common mistakes. There is also a meter that estimates your permission risk and a checklist you can use to test your own setup. For two-step verification, which protects the account itself, see 2FA (İki Faktörlü Doğrulama) Nasıl Kullanılır? article, and for the site's general security layers, E-Ticaret Sitesi Güvenlik Sistemleri article; here we focus on team permission design and day-to-day operational security.
What Is Staff Permission Management?
Staff permission management means giving each team member who uses the e-commerce admin panel access only to the screens and actions their job requires, and closing off the rest. A permission defines what a person can see and what they can change.
It comes down to answering three questions: Who can log in to the panel? What can they access (orders, products, customers, prices, settings)? What can they do (view only, or edit and delete)? Once these three questions are clearly answered for every team member and role, permissions are in place.
| Concept | What does it mean? | Example |
|---|---|---|
| Identity verification | Proving that a person really is who they claim to be | Username, password, two-step verification |
| Authorization | Determining what the verified person can access | A warehouse employee sees orders but not prices |
| Role (user group) | A set of permissions granted together to people who do the same job | Warehouse, customer service, accounting |
| Permission review | Regularly re-checking the permissions already granted | A quarterly list of who can access what |
Confusing the two is a common mistake: a strong password or two-step verification protects a person’s identity, but if that person has been given more permissions than necessary, even a verified user can do serious damage. The two are used side by side, not in place of each other.
Okumanızı öneririz2FA (İki Faktörlü Doğrulama) Nasıl Kullanılır?Why Is Staff Permission Management Important?
Staff permission management matters because it limits the impact of mistakes, makes responsibility visible and keeps sensitive data from circulating unnecessarily. Even in a small team it delivers four concrete benefits.
- The error surface shrinks: A customer service employee without access to the price screen cannot change a price by accident. Leaving every screen open means every moment of carelessness can spread across the whole store.
- Responsibility becomes traceable: When everyone has their own account, you can ask who made a change. An action taken with a shared password belongs to no one.
- Data stays protected: A customer’s address, phone number and order history are personal data. Limiting access to those whose job requires it matters for both customer trust and legal obligations. For the legal side of the topic, see the guide How to Ensure KVKK Compliance for an E-Commerce Site.
- Departures go safely: In a role-based setup, it is clear which access to close when someone leaves; no permission is forgotten just because it lingers in someone’s memory.
Most of these benefits protect against ordinary human error, not a malicious actor. Most panel incidents begin with a well-meaning person clicking the wrong place. Permissions make sure that click is stopped before it does harm.
What Is the Principle of Least Privilege?
The principle of least privilege means giving a person the smallest set of permissions needed to do their job; anything more is added only when required and only for as long as required. The default is “closed,” and every permission that is opened has a reason.
In practice, this principle is applied through four rules:
- Start closed: A new team member starts with no permissions; the areas their role requires are opened one by one.
- Separate viewing from editing: Seeing a screen is a different permission from changing the data on it. An accountant needs to see an order, not cancel it.
- Keep temporary permissions temporary: Extra permission granted for a campaign week is taken back when the week ends. Saying “we’ll remove it later” often means “we never will.”
- Keep administrators few: The number of accounts that can access everything stays as low as possible. Every administrator account enlarges the attack and error surface.
In business terms the principle is simple: if the answer to “what would happen if this person could not do this?” is “nothing,” that permission should not be granted. Adding a permission later takes a minute; undoing the damage caused by a wrongly granted one is far harder.
What Are the Typical Roles and Permissions in an E-Commerce Team?
In e-commerce teams, roles usually split into orders and warehouse, customer service, marketing, accounting and administrator; each role needs a different part of the admin panel. The matrix below is a starting suggestion; adapt it to your own workflow.
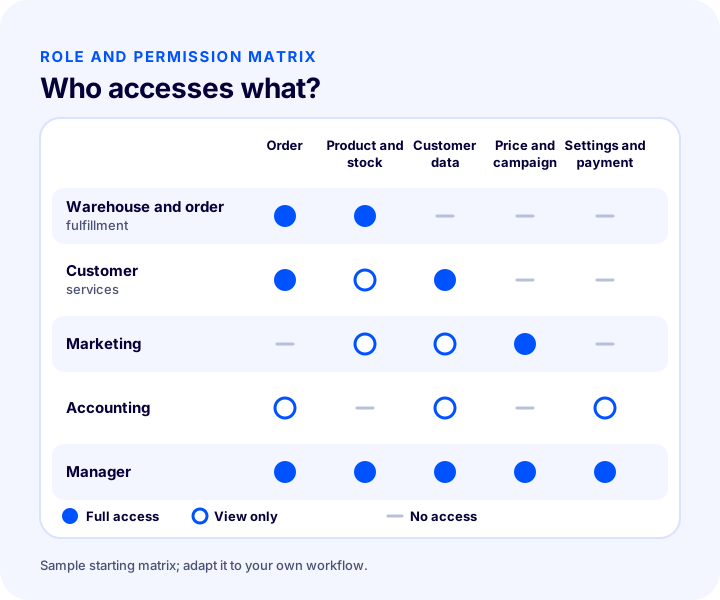
| Role | Order | Products and stock | Customer data | Price and campaigns | Settings and payment |
|---|---|---|---|---|---|
| Warehouse and order preparation | Full | Full (stock) | No | No | No |
| Customer service | Full (cancellation, return, notes) | View | Full | No | No |
| Marketing | No | View | View | Full | No |
| Accounting | View | No | View | No | View (payment reports) |
| Manager | Full | Full | Full | Full | Full |
The table is a starting point, not a template. In a small business where one person handles both customer service and accounting, you need a combination of the two roles; in a large team, the warehouse may split into “pickers” and “stock counters.” What matters is that the role comes from the job description, not from a person’s title or seniority.
1. Warehouse and Order Preparation Role
The warehouse employee sees, prepares and packs orders, hands them to the carrier and counts stock. Prices, campaigns, the customer’s payment details and store settings are not part of this role. Of the customer data, only what is needed for delivery is required.
2. Customer Service Role
Customer service should see order status, manage the return and cancellation flow and reach customer notes. Seeing products and prices is enough; changing them is not needed. This role gets the broadest access to customer data, so powerful permissions such as bulk export must be granted to it deliberately.
3. Marketing Role
The marketing team works with price, discount and campaign settings; editing product descriptions and images is often part of this role too. It does not need order or payment details; seeing customer data at summary level is usually enough.
4. Accounting Role
Accounting sees orders, invoices and payment reports, and accesses the reports needed to close the books. It does not need to edit orders or products. For invoicing processes, consider the workflow on the e-Invoice page together with this role’s screen needs.
5. Administrator Role
The administrator accesses every area, defines permissions and changes settings. This role should have the fewest possible holders; in most businesses the store owner and one backup administrator are enough. Using an administrator account for day-to-day work is the most common shortcut mistake.
Recommended readingE-Commerce Order Management: A Step-by-Step Guide from Order to DeliveryHow Do You Design Permissions Step by Step?
Permission design is done by first listing tasks, then grouping them into roles, defining the permissions each role needs and finally assigning people to roles. Reversing the order and looking at people first leads to complicated exceptions, account by account.
1. List the Tasks Done in the Panel
Write down what the team does in the panel through the day: approving orders, entering shipping codes, updating prices, approving returns, downloading reports, adding products, setting up campaigns. The list is the raw material for the question of who does what.
2. Group the Tasks into Roles
Bring together the tasks done by the same people and give each group a name. Starting with two or three roles is enough; multiplying roles multiplies maintenance. If a role has only one person, it may be possible to merge it into another role.
3. Write Down the Permissions Each Role Needs
For each role, define the areas it “can view,” “can change” and “cannot see at all,” and put them in a one-page table. This table becomes the written record used for both implementation and review; a permission design kept in someone’s head is soon forgotten.
4. Separate the Critical Permissions
Bulk price changes, deleting orders, exporting the customer list, payment and store settings, and granting permissions to other users are critical permissions. Give them only to the few people who truly need them and, where possible, have them used together with a second verification.
5. Assign People to Roles and Test
Instead of granting permissions to people one by one, assign them to roles (user groups); when a role’s permissions change, all its members are updated together. After assigning, test whether an employee can do their job, using their account or sitting with them: a missing permission slows work, an excess one creates risk.
How Is Staff Permission Management Done in Faprika?
In the Faprika admin panel, staff permissions are managed by assigning permissions to user groups, and the “User / Staff Permission” feature is available in all plans. You can see the differences between plans on the e-commerce plans page.
According to the panel’s usage training, on the “Permissions” tab of the Configuration menu you can set how far user groups can access the control panel. The method the training describes is this: you create a new user group and assign only specific permissions to its members. The training’s example is a staff group that can access only order and product management and cannot touch other settings. For a step-by-step walkthrough, see the User Groups training page.
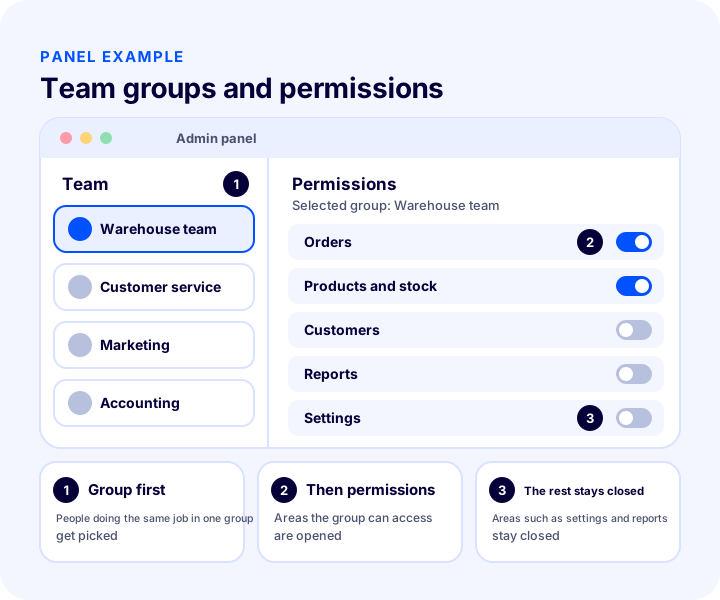
Screen names and values in the illustration are for explanation only; for the steps of the real screen, rely on the training page. The logic is the same everywhere: first the group, then the areas that group can see and act on.
Operational features such as order picking work with the same group logic. The Order Verification training explains that the picking staff are defined through a specific user group and that, for example, a “Warehouse” group can be selected; this way the warehouse team’s work and permissions are gathered in the same group. For details of the feature, see the Order Verification page.
Faprika’s easy-to-use panel takes the complexity out of permissions: because the admin panel is designed on the “Easy to Use” principle, you and your team can manage it after a very short training. So no lengthy preparation is needed for each new person; the real work is deciding which permissions go to which role.
Okumanızı öneririzE-Ticaret Sitesi Güvenlik SistemleriWhat Should You Do When a Team Member Joins, Changes Roles or Leaves?
Permission management is not a one-time setup but a process that runs through a person’s journey in the business: on joining, access is opened with the group matching their role; on a role change, old permissions are closed; on leaving, access is cut the same day. Most open doors remain at role changes and departures.
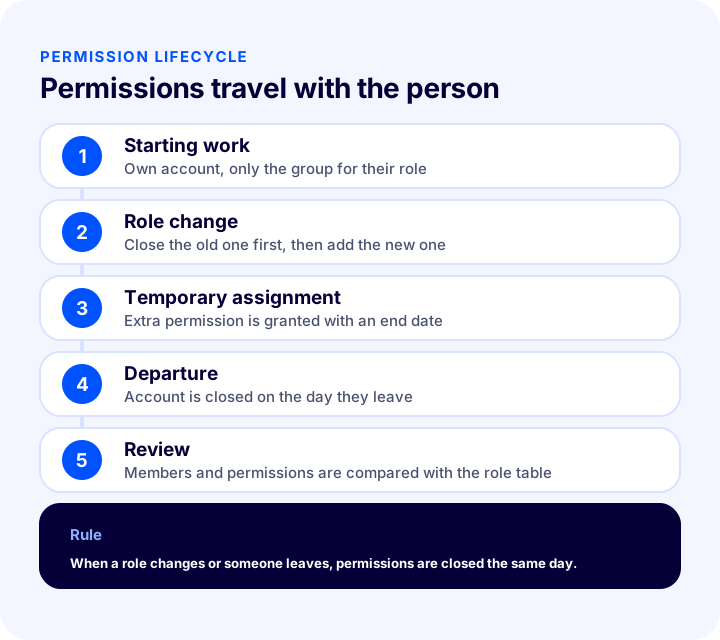
| Moment | What to do | Common mistake |
|---|---|---|
| Starting work | Create the person’s own account, add them only to their role’s group, and have them set up two-step verification at first login | Handing over a shared account’s password or making them an administrator “for now” |
| Role change | Close the old role’s permissions and move them to the new role’s group | Adding the new permission without removing the old one; permissions pile up |
| Temporary assignment | Grant the extra permission with an end date and put the removal task in the calendar | Forgetting the permission once the task is done |
| Departure | Close the account on the day the person leaves and change any other shared secrets (if any) | Leaving the account open “a few more days” |
| Regular review | Compare each group’s members and permissions against the role table | Never looking; the permission list swells over the years |
Joining: How Is Access Opened on Day One?
On the first day, a separate account is created for the person and they are added only to their role’s group. The person who creates the account should not know the password; the person should set their own password at first login. If someone else knows the password or recovery details, responsibility for every action on that account becomes unclear.
Role Change: Don’t Let Permissions Pile Up
When a warehouse employee moves to customer service, new permissions are added but the old ones are often not closed. After a few role changes, that person works with broader permissions than anyone planned. In a role change the only step should be “first close the old one, then add the new one.”
Departure: Close It the Same Day
The account of a departing person should be closed on the day they leave. Write this into the departure process as a checklist item, even into the HR or business owner’s departure list. Besides the panel, put the other systems that person accessed (such as email, the accounting program, shipping and marketplace panels) on the same list; closing access in one place is not enough.
We recommend readingCybersecurity in E-CommerceWhy Does a Shared Password Cause Problems?
A shared password means several people log in to the panel with the same account; it is the most common and most harmful permission mistake, because it makes it impossible to know who did what and requires changing the password whenever one person leaves. It seems to save time at first, but the cost is paid later.
- The trail disappears: When a price is entered wrongly or an order is cancelled, nobody knows who is responsible; everyone says “not me.”
- Departures get harder: When a person leaves, the password must be changed and the new password passed to everyone again. Most businesses skip this.
- The password gets around: A shared password lives in messaging apps, notebooks or on paper at the edge of a screen; the more people know it, the more places it is found.
- Two-step verification loses its meaning: Two-step verification tied to a single phone means everyone needs the same phone; in practice it gets turned off.
- Permissions cannot be separated: Because everyone uses the same account, the difference between a warehouse employee and an administrator disappears.
The solution is simple: one account per person. You might think management gets harder as accounts multiply, but the role (group) logic lightens the job. You add a new person to their role and remove the one who leaves; you never have to share a password.
How Do You Measure Your Permission Risk?
Permission risk comes from the combination of two factors: many people holding administrator-level permissions, and the permissions of people who leave or change roles being closed late. The tool below evaluates the two together and shows a rough risk level.
Here is how the model works: the number of people with manager-level access is divided by the team size to get the share of privileged users; the number of people who leave or change roles each year is multiplied by the delay in closing their access, giving the person-days of access left open too long. The privileged share and the delay are assessed together to give a low, medium or high level. The values are assumptions; replace them with your own team's figures.
Keep two things in mind when reading the result. First, the two factors complement each other: even with few privileged users, the risk remains if accounts stay open for weeks after someone leaves; even with a short delay, if everyone is an administrator, a single mistake can reach everything. Second, the tool does not produce a number for you, it starts a conversation: it prompts your team to discuss who holds how much access and who is responsible for the offboarding process.
How Often Should Permissions Be Reviewed?
Permissions should be reviewed at least once every three months and after every major change (a new team, a new channel, a new system, a busy season). A review means comparing each group's members and permissions against your role table.
- List the members: Check who is in each group. If you find someone who no longer works with you or whose role has changed, close the account immediately.
- Compare permissions with the table: If a group's actual permissions exceed the written role table, question the excess.
- Close unused permissions: A permission someone has not used for a long time is a candidate for closing.
- Count the administrator accounts: If the number has grown, ask for the justification for each one again.
- Record the result: Keep a short note of what you found on which date and what changed; the next review starts from this note.
This task should take minutes, not hours; the goal is not a big audit but preventing the setup from quietly deteriorating. Putting a recurring reminder in the calendar is the most effective way to make sure it actually gets done.
Common Mistakes in Staff Permissions
Permission mistakes usually come from habit and haste rather than technical problems. The most common are these:
- Using a shared password: The audit trail disappears and offboarding gets harder.
- Making everyone an administrator: Administrator rights granted “to save time” become permanent.
- Building roles around people: Creating a separate permission combination for each person quickly turns into a table you can no longer manage; roles are built around tasks, not people.
- Letting permissions accumulate: Not removing the old ones when a role changes.
- Delaying offboarding: Leaving the account open “for a little longer.”
- Not keeping a written record: If the role and permission table is not written down anywhere, no one knows who made which decision and why.
- Skipping two-step verification: Protecting the accounts with the broadest permissions with only a password.
- Treating external people differently: An agency, consultant or anyone providing outside support also needs a separate account, limited permissions and an end date.
Permission Audit Checklist
The list below tests in eight items whether your permission setup is sound. When every item is a “yes,” your setup rests on a solid foundation. Tick the items and see the result.
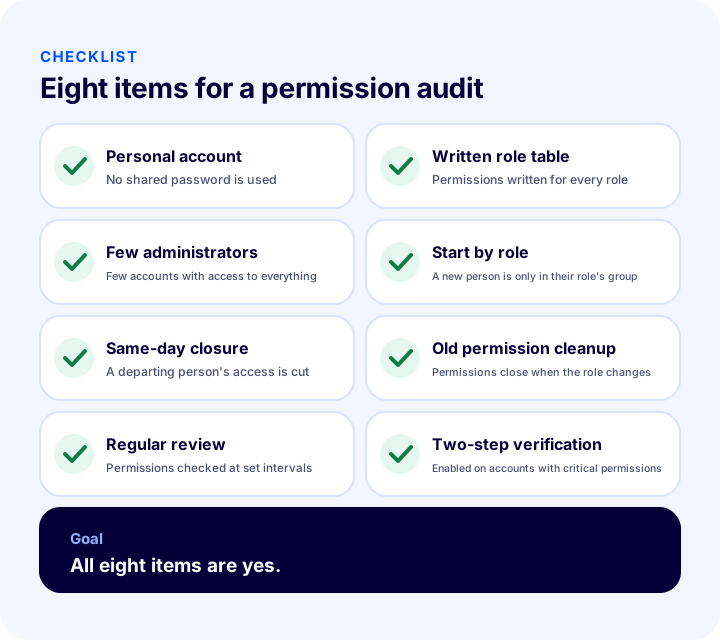
| Field | Check | Done? |
|---|---|---|
| Calculation | Everyone has their own account, no shared passwords | Yes / No |
| Record | A written permission table exists for every role | Yes / No |
| Manager | Manager-equivalent access is kept to a minimum | Yes / No |
| Start | New staff start only with their role's group | Yes / No |
| Departure | Access is closed on the day of departure | Yes / No |
| Role change | Old permissions are removed | Yes / No |
| Review | Permissions are checked at set intervals | Yes / No |
| Verification | Two-step verification is used on accounts with critical permissions | Yes / No |
Frequently Asked Questions
What are staff permissions?
Staff permission management in an e-commerce admin panel means giving each team member access only to the screens and actions their job requires and closing off the rest. It determines who can see what and who can change what.
What is the principle of least privilege?
The principle of least privilege means giving a person the smallest set of permissions needed to do their job. A new person starts with everything closed, the required areas are opened one by one, and temporary permissions are withdrawn when the time ends.
Why is giving everyone the same password a problem?
With a shared password you cannot tell who performed an action, when someone leaves the password has to be changed and sent to everyone again, and permissions cannot be separated. The solution is one account per person and granting permissions through roles.
When should a departing employee's access be closed?
On the day they leave. This step should be on the offboarding list, and not just the panel but every other system the person accessed should be closed the same day. Leaving it open “a few more days” is the main cause of forgotten accounts.
How often should permissions be reviewed?
At least every three months, and whenever there is a major change in the team, channels, or systems. A review means comparing each group's members and permissions with the written role table; unused permissions and old accounts are closed.
Does Faprika have staff permissions?
Yes, “User / Staff Authorization” is available in the Faprika panel on all plans. As described on the training page, you can create a user group and use the “Permissions” tab in the Configuration menu to set the areas this group can access. You can see the plan differences on the e-commerce plans page.