Contents 14 sections
- What Are E-Commerce Email Settings?
- What Is the Difference Between System Emails and Bulk Emails?
- Why Are Email Settings Important?
- How Is an Email Account Defined in the Faprika Panel?
- Why Must the "Send Email" Task Be Active for Sending?
- How Should the Sender Name and Address Be Chosen?
- What Does Outgoing Mail Server Information Mean?
- Why Does Email Land in the Spam Folder?
- What Are SPF, DKIM and DMARC?
- Can Daily Email Volume Exceed the Sending Limit?
- What Are Common Email Setting Mistakes?
- Checklist for Email Settings
- Email Settings with Faprika
- Frequently Asked Questions
The customer placed an order and the payment went through, but the confirmation email never arrived. Or it arrived but landed in the junk emails folder, and the customer called the support line asking "wasn't my order received?" In e-commerce, system emails are like a silent worker: when they run well nobody notices, when they break everybody does. Most of the time the problem is not in the text of the email but in how the account sending the email is defined.
In this guide we cover e-commerce email settings end to end: how to choose the sender name and address, what the outgoing mail server details are, how to define an email account in the Faprika panel, why a test email and a scheduled task are essential, why emails land in the spam folder and what you can do to reduce this. At the end of the article there are two small tools: a calculator that compares your daily email volume with your provider's limit, and an eight-item settings check. Writing the content of emails is a separate topic, so here we focus only on settings and configuration; for the content side, see the articles on order confirmation email and message templates.
E-Commerce Email Settings: What Are They?
E-commerce email settings are the configuration that determines from which address, under which name and through which outgoing mail server the emails your store sends automatically to customers are delivered. All system emails, such as order confirmations, shipping notifications, membership emails and password reset links, rely on these settings.
In Faprika these settings are in the control panel under Configuration > Email Accounts. Here you define an email account; the system sends the emails going to customers with this account's details. The account's email address is the address the customer sees as "from" in their inbox; the email name is the name shown in the sender line.
We can group the scope of the settings under three headings:
- Identity: the sender address and sender name. The customer sees only these before opening the email.
- Connection: the outgoing mail server's address, port, username, password and SSL preference.
- Trust: the records that let receiving servers verify that the sender really owns the domain (SPF, DKIM, DMARC).
What Is the Difference Between System Emails and Bulk Emails?
A system email is an email sent automatically in response to the action of a single customer; a bulk email is a campaign or newsletter sent to many subscribers at once with the same content. The two differ in settings, risks and the right tool.
A system email is an expected message: the customer placed an order and is waiting for confirmation. That is why open rates are high and receiving servers are usually more tolerant of this kind of traffic. A bulk email, on the other hand, goes to hundreds or thousands of addresses at once; receiving servers scrutinize it more strictly and the complaint rate directly affects sender reputation.
| Feature | System email | Bulk email |
|---|---|---|
| Trigger | The customer's action (order, shipping, membership) | Your decision (campaign, newsletter) |
| Number of recipients | One person | List, segment |
| Customer expectation | Pending | Not expected, depends on consent |
| Right tool | The store platform's email account | A service specialized in bulk sending |
| Main risk | Sending failure, spam folder | Complaints, reputation loss, limit exceeded |
Faprika's training document is clear on this: the email services provided by Faprika are not suitable for bulk mailings (campaigns, announcements, etc.); for such sending, working with companies specialized in bulk sending is more effective and safer. For the newsletter and campaign side, see what is an e-newsletter and the article on e-posta pazarlaması stratejileri article.
Why Are Email Settings Important?
Email settings matter because system emails are the most trusted communication channel you have with customers, and when they do not arrive, both trust and support load are directly affected. Three concrete consequences stand out:
- Trust. A customer who gets no order confirmation suspects the order was not received; often they consider placing a second order or cancelling.
- Support load. Questions like "my email didn't arrive" are needless work for the support team. Most are a settings or spam-folder issue.
- Brand image. Seeing a random address or a cold name like “noreply” in the sender line makes your store look smaller than it is. A familiar name and address build trust.
A misconfigured account can also cause emails not to be sent at all. When the password changes or the server details are entered incorrectly, sending stops silently. That is why the setting needs to be checked at regular intervals, not only during setup.
We recommend readingHow to Write an Order Confirmation Email?How Do You Set Up an Email Account in the Faprika Panel?
In Faprika, an email account is set up in the control panel under Configuration, in the Email Accounts section; you enter the account details, save the settings, and verify them by sending a test email. The steps follow the order in the training document.
1. First sign in to the email account
If Faprika has assigned you an email address, first sign in to that account’s webmail screen. A user agreement screen may appear on first login; finish the process with the “Complete registration” option. If the screen does not appear, the account has already been confirmed. This step lets you make sure the account really works; there is no point in setting up a non-working account in the panel.
2. Open the Email Accounts screen in the panel
In the control panel, go to the Email Accounts tab under Configuration. If a test account has been created, click it to see the details; if there is no account, create a new one with the “Add New” button.
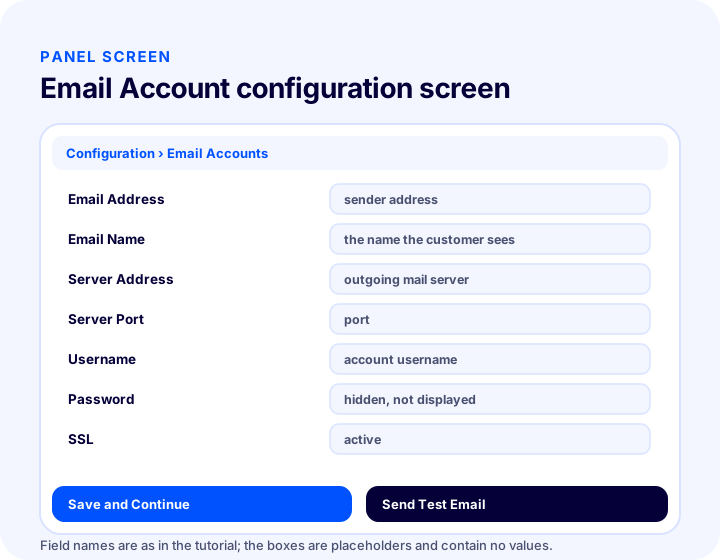
3. Fill in the fields
The fields on the screen are as follows. You take the values from the information provided by your email service:
| Field | What to write? |
|---|---|
| Email Address | The email address assigned to you; the customer sees this as the “from” address |
| Email Name | The sender name of the email sent to the customer (for example, your store’s name) |
| Server Address | The outgoing mail (SMTP) server address of your email service |
| Server Port | The port specified by your service; 587 in the training example |
| Username | The email address assigned to you |
| Password | The password of this email account |
| SSL | Active |
Never share this information by email, messaging app, or screenshot; in particular, enter the password only in the relevant field of the panel.
4. Save and send a test email
After filling in the fields, click the “Save and Continue” button, then send yourself a test email from the “Send Test Email” area. If the email arrives, the account is working. If it does not, first check the server address, port, username, and password; these four fields are the source of the vast majority of errors.
Why Must the “Send Email” Task Be Active for Sending?
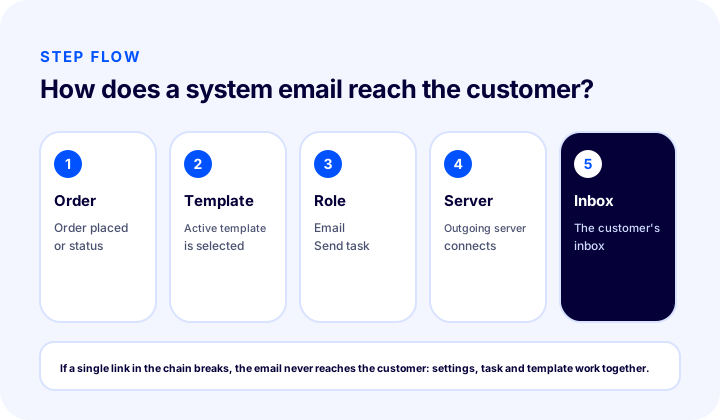
Even if the test email succeeds, for email to reach customers the “Send Email” task must be active in the panel under System, on the Scheduled Tasks screen. According to the training document, order updates, product notifications, and other automatic customer notifications are delivered through this task.
After activating the task, you can also trigger it manually with the “Run Once” option. Doing a trial with this button right after setup is the quickest way to see that the task really works. A common mistake is to define the account correctly and pass the test, then forget to activate the task; in that case the settings look right, but no email reaches the customer.
Once the task is active, the active templates in the Message Templates area are sent automatically to customers according to order statuses. The templates determine which email goes out in which situation; the email account settings described in this article determine who sends it, under which name, and from which server. For managing templates, see the Message Templates Management training.
Setup order: a short summary
- Sign in to the email account and complete registration if needed.
- In the panel, open the Configuration > Email Accounts screen; if there is no account, create one with “Add New”.
- Fill in the sender address and name, server details, username, password, and SSL fields.
- Click “Save and Continue” and try it with “Send Test Email”.
- On the System > Scheduled Tasks screen, activate the “Send Email” task and try it with “Run Once”.
- Check which templates are active in Message Templates.
How Should the Sender Name and Address Be Chosen?
A good sender name is one the customer recognizes and trusts at once as the email’s sender; a good sender address is one that matches your store’s domain, really exists, and can be replied to. Before opening the email, the customer looks only at these two.
- Use your store’s recognized name as the name. Let the customer see in the email the same name they saw on your site. A brand name rather than a personal name (“Ayşe”) is more consistent in system emails.
- Choose the address from your own domain. An address that matches your domain is the soundest choice for both brand image and deliverability. Receiving servers check whether the sender address’s domain matches the identity of the server sending the email.
- Do not use an address that cannot be replied to. When a customer replies to the email, losing the answer is a bad experience; choose an address whose replies are monitored.
- Keep the name short. In mobile inboxes the sender name is truncated; choose a short, clear name rather than a long one.
- Do not change the name often. Once a customer has recognized a name, a change makes the email look like it comes from an unknown sender.
Typos and exaggerated capital letters are distracting in the sender name as well. The “Store Name” format is enough; there is no need to add exclamation marks, adjectives, or campaign phrases.
What Do the Outgoing Mail Server Details Mean?
The outgoing mail server (SMTP) is the server that starts the email’s journey from you to the recipient; the address, port, username, password, and SSL preference you enter in the panel define how to connect to this server.
- Server address: the name of the outgoing mail server of your email service. One wrong letter prevents sending from ever starting.
- Port: determines which door is used to talk to the server. Your email service tells you the correct value; 587 is used in the training example.
- Username and password: the credentials used for the server to recognize you. When the password is changed, it must also be updated in the panel; otherwise sending stops silently.
- SSL: ensures the connection is established encrypted. The training indicates it as “Active”.
Changing the password is one of the most often forgotten topics. If you do not update the panel after renewing the email account’s password for security reasons, the system tries to connect with the old password and emails cannot be sent. Tying password renewal to a checklist item prevents this problem.
Why Does Email Land in the Spam Folder?
Email usually lands in the junk email folder when the sender’s identity cannot be verified, when the content or sending behavior looks suspicious, or when recipients have marked previous emails as spam. There is no single cause; receiving servers evaluate many signals together.
| Risk | Why is it a problem? | What is done? |
|---|---|---|
| Unverified sender | The receiving server cannot verify that the email really comes from the domain owner | Set up SPF, DKIM, and DMARC records |
| Mismatched address | The sender address does not match the actual sending server | Use an address belonging to your own domain |
| Bulk traffic | Campaign and order emails go from the same account, so complaints get mixed | Move bulk sending to a separate service |
| Over-emphasized subject | Many exclamation marks, all capitals, and exaggerated promises are treated as spam signals | Write the subject line plainly and informatively |
| Broken links | Non-working or suspicious links reduce trust | Test template links regularly |
| Invalid addresses | Sending to non-existent addresses produces bounces | Pay attention to address validation on the registration form |
In system emails, content risk is relatively low; the real problem is authentication and sender consistency. That is why the following sections focus on identity records.
What Are SPF, DKIM, and DMARC?
SPF, DKIM, and DMARC are three records the domain owner keeps in the DNS settings; they let receiving servers check whether the email really comes from that domain and whether it was altered along the way. These are general email standards, not a Faprika-specific feature, and the records are defined where your domain is managed.
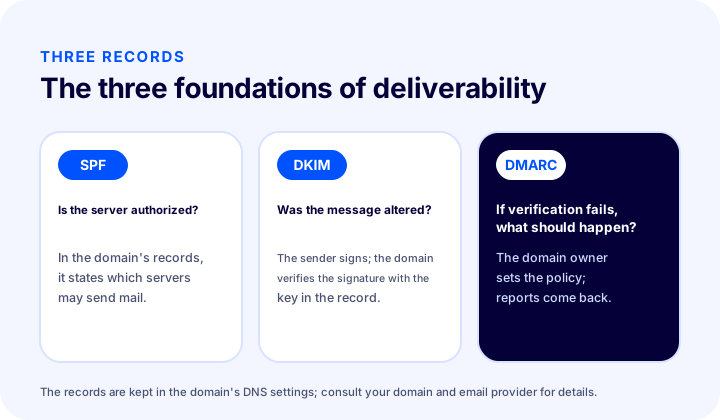
- SPF: lists which servers may send email on behalf of your domain. The receiving server compares the server that sent the email against this list.
- DKIM: the sending server digitally signs the email; the recipient verifies the signature with the key in the domain’s records. If the signature matches, it is clear the message was not altered in transit.
- DMARC: as the domain owner, you decide what the receiving server should do when SPF and DKIM verification fails (report it, quarantine it, or reject it) and where reports should go.
In practice, what you need to do is this: add the SPF and DKIM information provided by your email service to your domain’s DNS settings, then start the DMARC policy in monitoring mode first. Who adds these records depends on who manages your domain and your email service; if you are unsure, consult your email service provider and your domain administrator. A wrong DNS record can cause all of your emails to be rejected; so make changes in small steps and send a test email after each step.
Okumanızı öneririzE-Ticarette E-Mail Marketing StratejileriCan the Daily Email Volume Exceed the Sending Limit?
Most email services apply a certain daily sending limit per account; sends that exceed this limit may be delayed or rejected. The limit varies from provider to provider, so you should learn the value not from this article but from your own email service’s documentation or support team.
Estimating your own volume is easy: multiply the number of daily orders by the number of emails sent per order (such as order confirmation, shipped, delivered). The tool below does this calculation and compares the result with the limit you enter.
On campaign days the number of orders can rise far above normal. Do the calculation not only for the average day but also for the busiest day: if the busy-day volume stays below the limit, you will not run into problems.
What Are Common Email Setup Mistakes?
Mistakes in email settings usually come from small details: a wrong character, a forgotten step, or a setup that was never tested. The list below gathers the most common ones.
- Not activating the “Send Email” task. The setting is correct, the test succeeds, but nothing goes out to the customer.
- Renewing the password without updating it in the panel. Sending stops silently.
- A typo in the server address or port. The connection cannot be established at all.
- Leaving SSL off. The training example specifies SSL as active; the server connection may expect it.
- Sending the test email to only one mailbox. A problem at a recipient on another provider goes unnoticed.
- Sending campaign and order emails from the same account. Complaints also harm order emails.
- Using an unrecognized sender name. The customer deletes the email without opening it or marks it as spam.
- Never setting up identity records. Without SPF, DKIM, and DMARC, deliverability is left to chance.
- Never checking after setup. Even if a setting is correct once, it can break over time.
Checklist for Email Settings
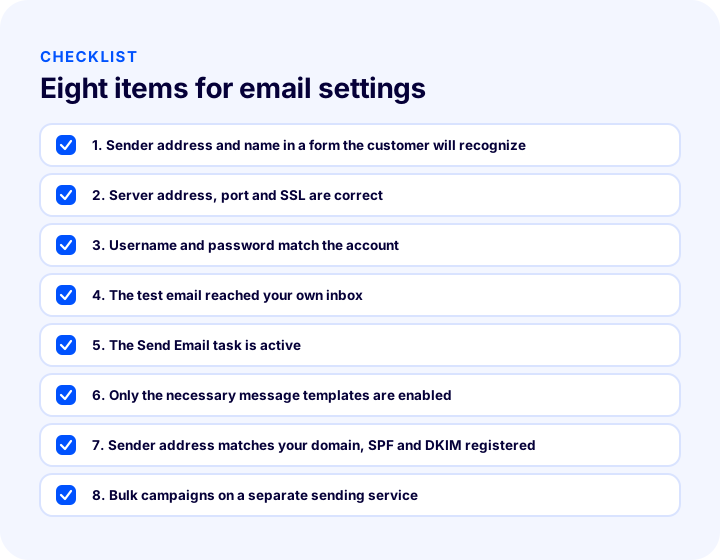
The eight items below bring together all the steps in this article in a single check. The image and the tool carry the same items; you can see your status by ticking them.
| Check | Why does it matter? |
|---|---|
| Sender name and address | Customers look only at these before they open the email |
| Server details and SSL | Required to establish the connection |
| Username and password | If the password changes, sending stops |
| Test email | The only proof that the setting really works |
| Send Email task | If the task is not active, no email goes out |
| Message Templates | Determines which email is sent in which situation |
| SPF and DKIM | Verifies the sender's identity and reduces spam risk |
| Separating bulk sending | Protects the reputation of order emails |
Email Settings with Faprika
In Faprika, email account settings, message templates and the sending task complement each other in the same panel: you define the email account under Configuration, choose in Message Templates which email goes out in which situation, and activate the sending task in Scheduled Tasks. According to the training document, when these parameters are entered correctly the process runs automatically; your customer is informed at every stage, from order confirmation to shipping.
According to the plan feature table, the number of email accounts is unlimited; however, other features may vary by plan. To see what comes with which plan, you can review our plans or request a demo. For campaign emails, the right approach is to work with a service specialized in bulk sending; keeping system emails separate from it protects your most critical messages. If you are also considering instant notifications, take a look at the what is push notification article.
Frequently Asked Questions
What are e-commerce email settings?
E-commerce email settings are the configuration that determines from which address, under which name and through which outgoing mail server the system emails that the store sends automatically to customers will go out. In Faprika, it is done in the Email Accounts section under Configuration.
How is an email account defined in Faprika?
In the panel, open the Email Accounts screen under Configuration; create the account with "Add New", fill in the email address, email name, server address, port, username, password and SSL fields, save with "Save and Continue", and verify with "Send Test Email".
The test email arrived but no email goes to the customer. Why?
The most likely cause is that the "Send Email" task is not active on the Scheduled Tasks screen under System in the panel. The first check is to activate the task and try it with "Run Once"; then check that the relevant template is active in Message Templates.
Why do emails end up in the spam folder?
They can end up there when the sender identity cannot be verified, when the sender address and the sending server do not match, when the content looks suspicious, or when recipients have marked previous emails as spam. Setting up SPF, DKIM and DMARC records, using a consistent sender name and separating bulk traffic reduce the risk.
What are SPF, DKIM and DMARC, and are they mandatory?
They are three records kept in the domain's DNS settings: SPF defines the authorized servers, DKIM the message signature, and DMARC the policy applied when verification fails. Whether they are mandatory depends on the receiving server, but they are strongly recommended for deliverability.
Can I also send campaign emails with the account I defined in the panel?
According to Faprika's training document, the email services provided by Faprika are not suitable for bulk sending. For campaign and notification mailings, working with a service specialized in bulk sending is more effective and safer.